Monday, October 31, 2011

Halloween Nails - Candy Corn!

Happy Halloween everyone!

I present to you the third and final installment for this year's Halloween themed manicure - candy corns!

Candy Corn manicure

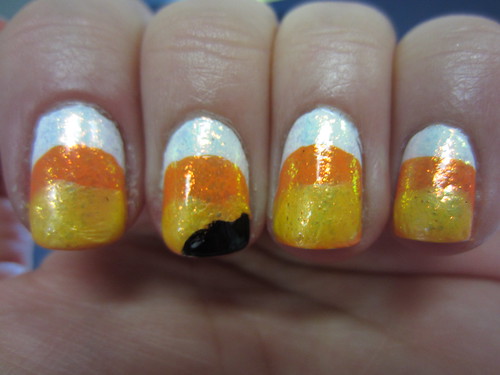
For this manicure I "free handed" the design. I applied each tier of nail polish in the same way that I would apply nail polish near my nail bed - only about half a centimeter from the previous color. The application is far from perfect, which is why I chose to apply opalescent flaky polish to help blur the lines of polish.

I started with white polish - Orly's White Out. I really could use a new bottle of white polish. This bottle is quite old and took three coats to get the streaks near the nail bed out. Next I applied my orange - Orly's Sol Cabana. This is a nice happy shade of orange, and while I don't wear orange polish regularly, when I do wear it, I should reach for this color more. My nail polish collection began in Sally Beauty Supply and so my polish collection includes Orly. Once I realized I didn't have to buy all my polishes from Sally, I pretty much stopped buying Orly as I found their polishes to be thick, goopey and streaky all at the same time. A good polish should be opaque in one coat, and maybe only need a second coat to achieve a completely even coverage. Orly's performance is at the opposite end of the spectrum. Now I only buy Orly when I will simply die without their unique colors. When Orly came out with their Cosmic FX Fall 2010 collection, I needed it. I knew I would probably have application issues, but that nail polish finish was so unique (at the time) that I happily plunked down my $40+ on the Sally checkout counter for the collection. Other than those rare occasions, I steer clear from Orly.

My final color was Sally Hansen's Complete Salon Manicure in Sunflower. You know, this manicure made me realize that there are some serious gaps in my nail polish collection. I didn't realized that I had only ONE white and not a single, vibrant creme yellow polish. Zoya's Pippa has been on my need to get list for a while, but I'm not sure if I can stop at only that one. Though Sunflower was the closest shade of yellow I own, it has an opalescent finish to it which is why I opted to put a top coat of Sally Hansen Complete Salon Manicure in Hidden Treasure to add the opalescence to the other colors on my nail.

Let's tally up the coats of polish, shall we? Three white, two orange, two yellow, two Hidden Treasure = 9 coats. I topped this all with a final thick coat of Seche Vite. It got my nails dry to the touch, that was certain. However, I fell asleep before my nails really hardened and some of the polish "moved." My middle finger was dented and nicked so badly that I just scraped the polish off the tip. Instead of trying to build up a new corner of yellow onto my nail, I took a black striper and turned the missing tip color into a bite mark. I know, candy corn are bite size and you really wouldn't bite into one, but you know what? Shut up. It was late last night, I realized my screwed up finger nail early this morning and didn't have time to fix it. This polish will be coming off tonight and I will be giving my UV free gel nail kit a go! I'm more excited for that than this candy corn mani, so sue me!

Just kidding! Love ya and thanks for reading!

Monday, October 24, 2011

Halloween Nails - Spiderwebs!

Look at me! Keeping my promises...go me!

Here is the nail I plan to rock until right before Halloween - Spiderweb nails!

Spiderweb nails

For this design I used Zoya's Dovima as my base color. I originally wanted a nude nail, but I wanted to minimize the layers of polish I had on my nail. And with a nude nail it always seems to take at the very least three coats to create opaque coverage. As I was gathering my polishes to start this nail design, I realized I have never worn my Zoya mattes before. I also knew I was going to use glitter in this design and I thought the matte would create a nifty contrast with the glitter on the nail.

Once I got my base color down (two coats) I dabbed some white nail polish (I believe the polish came from a Milani striper polish) and feathered out the polish with the tip of a cosmetic sponge to create almost a cloud of white in the corner of my nail (my left hand - not pictured - was done in a mirror image of my right hand). A word to the wise, if you are going to apply polish directly to the nail instead of on the cosmetic sponge, work quickly. If the wet polish sits on the base color too long it reactivates the polish underneath and creates a murky mess.

After I made my "cobweb" cloud, I repeated the above stippling process but this time with a silver glitter polish (I used a Milani glitter striper.) This step isn't necessary, and I think if you want a more realistic looking cobweb you can definitely skip the glitter. But what can I say - I love a little sparkle. And if I am going to take the time to do nail art in my mani at all - I want the full treatment!

Once my glitter cobweb was complete, I used a black Color Club striper to draw four long stripes beginning at the corner of the cobweb. Now comes the tricky part: take a well-wiped striper brush and make U-shaped swoops, connecting all the four diagonal lines on the spiderweb design. I did two tiers because I made my cobweb area too small for three tiers. I'll be honest - making the U-shaped swoops is difficult. The larger the U, the easier it is. But my smaller tier was basically straight lines connecting the diagonals. My other option was to use my Migi Nail Art pens, but it is difficult to control the flow of polish coming from the tip when you draw and I knew I would end up with a squiggly, goopy mess. If you have a better, steadier hand than me, by all means use nail art pens. Drawing a U is much easier than bending a striper brush.

I waited for my spiderwebs to dry and topped just the corner tip with a coat of Seche Vite. No need for a top coat for the Zoya matte polish - it dries super fast and should remain chip-free because the tips of the polish is protected with SV.

That is all for now! I picked up a what could could be awesome UV light-free gel nail polish system! I may have to wait until after Halloween to show you, but I am excited about the possibilities!

Wednesday, October 19, 2011

Halloween Nails!

Hello. To brief my readers from the last post. Yes, I kept the camera. Las Vegas was not too thrilling, but thoroughly exhausting. Our activities were...let's just say, not exactly my cup of tea.

Oh, and I still don't have a teaching job and am growing in my bitter disappointments each and every day. The OCCUPY movements and the I AM THE 99% movements are really speaking to me. However, this has my mind thinking about ways to earn other money. I am trying my darndest not to get a second job. I told myself I would be done with that crap after college.

But I also told myself I'd have a teaching job, so...

Onto the nails!

IMG_1128[1]
Mummy Nails!

For these nails I followed a tutorial by Misschievous.tv and used a base of Essie Sand Tropez, with Essie's Sew Psyched and Zoya's Dove stippled with a cosmetic sponged on top to give it a dusty and dirty appearance. Then I used my Color Club striper in black to outline the bandage wraps and made a thicker black strip towards the top. I used a larger dotting tool for the white eyes and an smaller dotting tool for the red pupils, paying attention to the direction the eyes would flash. After 30 minutes of dry time, I topped with Seche Vite (and still got freaking streaking) and voila! Mummy nails!

The plus side to this design is that people think the nails are so cute! (So cute that my boring ole' "only berry tones, please" Mom asked if I could do it on her nails for Halloween!) The downside to the design is that most people can't tell what they are supposed to be, but they do understand them to be creepy, which I guess is good.

Again, I am offering a lame apology to this blog and hope that this gets me out of my nail funk. I hope to try at least two more Halloween themed manicures before the season is over!